Thursday, December 9, 2021

Joy, Love, Xmas


Hello again everyone! Are you finished making your holiday cards? I started incredibly late and I'm still not quite done. Luckily, I don't have too many to send out. 

Today's card was fairly simple to complete. I used the Joy, Peace, Love die from My Favorite Things Stamps. I only used joy love and xmas. for this card. I cut the words out of red cardstock and then cut them out of both white cardstock and holly patterned paper. The holly paper is from the Lawn Fawn Snow Day remix collection. 


I glued each layer of the letters together, leaving the holly patterned paper on top. I them inlayed the letter into the red cardstock which I had glued onto a white card base. 


After inlaying the letters, I used a white gel pen to create dots of snow all over the red cardstock. It's difficult to see it in the photo, but I also put glossy accents in the star and heart of the Os in joy and love. This added a nice shine and sparkle to the card in person. That's all there was to it! I hope this helped to give you some inspiration if you haven't finished your holiday cards. Have a great day! 


Tuesday, December 7, 2021

Hello Bees!


 Hello fellow crafters and critters. Today's card was inspired by Jester from Critical Role. For those of you who don't know, Critical Role is a show with voice actors who play Dungeons & Dragons. This card references one of my favorite moments with the characters Jester and Cadeuceus. 

I started by watercoloring a panel in pink and blue. When it was dry, I splattered the watercolor paper with indigo watercolor. I used Kuretake gansai tambi watercolors.


When the panel was dry, I cut it down to about 4 /8 x 5 3/8 with my A2 layers dies from Waffleflower. The next part of this card was the most challenging. I wanted to have Jesters horns on this card so I had to figure out a way to get that shape. I had never made tiefling horns before, so it took a few tries! 

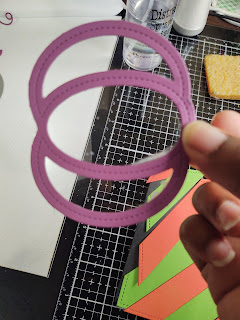
I accomplished making the horns by cutting a small circle out of a larger circle that was slightly scalloped. I used my small scissors to cut the pointed tip of the horn. To make them curve a bit I followed the lines from the scalloped edged on my scoring board with my bone folder. I was pleasantly surprised with how they turned out. 

Jester has metal caps on her horns, but I didn't have any silver embossing powder or nuvo drops, so I substituted ivory nuvo drops. It worked out well, and I love the shine it gives. This was my first time using nuvo drops!

 
I die cut the word hello in black and yellow. I used to yellow to create a shadow effect. A few layers of hello die cut in white are also glued together for some dimension. The horns were then glued to hello so I could put it on the card as one layer. 

I used the Lawn Fawn little fireflies set to create bees. All it took was to create some lines by coloring black and yellow onto the firefly stamps. I then added a little stinger with my micron pen. I think these bees are too cute! I made quite a few extras so you'll be seeing them in another card. I love that a set of fireflies can be used as bees. Versatility is always a plus with stamp sets. 


After coloring the bees, all I had left to do was assemble. I originally intended for the pink to be at the bottom. I accidentally glued the horns on before I noticed, but I actually think I like it better this way. I hope this card brought you some inspiration for card making. Have a lovely day! 


Monday, December 6, 2021

Catch up!


 Hello Everyone!

 It has been over a month since I've posted on here! I have made a few cards that I posted on Instagram, but I haven't posted them all on here. Since my last post, my daughter has gained 2 new teeth, learned to walk, and she turned 1!! I've been busy chasing her around the house while also trying to entertain my 4 year old son. 

I decided to start with a simple hi card to say hello again! For this card, I simply embossed some paper. I used sidewalk from Brutus Monroe. The embossing folder is called seedhead stems. It was on sale for .99 cents at Simon Says Stamp! 

After embossing the paper, I used my alcohol ink markers to color in the stems and leaves. I also used a marker for the brown seeds. My Sakura Gelly Roll gel pen is what I used for the white part of the seeds and some lines on the leaves.


The "hi" as well as the shadow are cut out in plain white paper. I colored the shadow with the same green marker. The hi die is from Photoplay paper. It's the same one I used for my "hi,hey,hello" card in a previous post. 


I had trouble deciding if I wanted the Hi at the top or the bottom of the card. I like it both ways, but ultimately decided to put it at the top. I may make another one so I have one of each! That's it! It was a pretty simple card to make. I think I'll be using embossing folders more often. Thanks for checking out this card. I hope you have a lovely day! 

Wednesday, November 3, 2021


Happy November, Everyone!
 
     Now I know most people are getting started on their holiday cards, but I'm still gushing over fall. I love the leaves as they change color and hearing them crunch under your feet. I'm just not ready for holiday cards yet!

  This card was created to play with a few of the leaves I made using a leaf stencil from Photoplay. 
Back on World Cardmaking Day, I won a giveaway from Photoplay, and these leaf stencils were a part of the prize! 

I haven't had much time to craft lately with a teething 11 month old and rambunctious 4 year old, but I was able to practice some ink blending with distress inks and these leaves are the result. 

You will definitely be seeing more of these leaves! I made a few sheets of different color combinations and cut them all out to use later. The stencil comes with 2 pieces. One piece is for the leaves and the other is decorative leaf veins. I used the 2nd stencil to dab some Versamark ink onto the leaves before adding embossing powder.

I struggled quite a bit with the end result of this card. I'm still not entirely happy with the leaf placement, but after fussing with it for far too long, I decided to just stick them where they were. Sometimes you just have to make it work and move on! What projects have you struggled with lately? 


Saturday, October 23, 2021


Hello Everyone!

Today's card was my experiment with Kuretake Gansai Tambi watercolors. Gansai Tambi is traditional Japanese watercolor. They are more opaque and sometimes use different binders than western watercolors, so I wanted to get some practice in and see if I like this type of watercolor. 

I started by painting the owl. 


It was quite relaxing to work with these paints. I'm excited to continue practicing with them. 
Once I finished with the owl, I set it aside to dry and painted some watercolor paper in oranges and browns. I then die cut the gears out of the watercolor paper.


I decided to add some black watercolor and splatter it with gold to give more of a rusty gear effect. I've also read that adding a bit of cinnamon can help with a rust effect, though I did not use that method this time. 


I splattered the background and added my owl, gears and sentiments! I used an acrylic block to make sure the word awesome stuck down properly. The gold behind the word awesome was painted with watercolor. It shows up a bit brighter in pictures than it is in real life. I definitely have a few changes I would have made on this card, but it helped me to practice with my watercolor and play a bit! 


Tuesday, October 12, 2021


Greetings crafty folks,

Halloween is quickly approaching, and I'm not the least bit ready. What about you? In this house, we haven't even decided on costumes. I made this glow in the dark Halloween card to help us get in the spirit. My kids loved seeing this shaker glow in the dark! Here's how I put this card together:

I started out by making the shaker. I die cut 7 pumpkins out of white cardstock and 1 pumpkin in purple. I glued all of the white pumpkins together and let them dry. I also cut down a piece of acetate and glued it to the purple pumpkin piece. This is the top of the shaker. 


While I let the shaker pieces dry, I glued orange and green strips to my card base. I die cut these with a Lawn Fawn Simple Stripes background die. The pumpkin is also from Lawn Fawn. 


Once everything was dry I put the shaker together. I initially glued some green paper to the back, but decided, it looked batter in all purple and glue the inner parts of the purple pumpkin to the inside of the shaker. Then I added some glow in the dark crystals and black sequins. 


I love how the shaker turned out all on its own. This could be used as a tag or interactive Halloween decoration. I made my shaker separately, but you can always just glue the stacked pumpkins directly to the card base and add your sequins before putting the top pumpkin layer on.

After finishing the shaker, all I had to do was glue it to the card base, stamp the card, and add a few more black sequins. I used my Hero Arts Celebrate everyday set to stamp Happy Halloween.

I had so much fun making this card, and it was really cool to see it glow in the dark. This card was definitely a family favorite! Check out that glow! I hope you all have a wonderful week and have time to get crafty. 


Sunday, October 10, 2021

Easy Peasy


Hello fellow crafters,

Today's card is a quick and easy card! I ordered a few things from My Favorite Things and felt compelled to create a Christmas card. I thought it would be fun to change up this tropical leaf cover plate and create something for Christmas instead of a tropical scene. 


All I had to do to create this card was die cut some red paper with the cover plate and remove all of the small paper pieces. I glued the die cut background onto a 4.25x5.5 green panel. It took a bit of time to dot the glue all over the back. I may try an adhesive sheet or tape gun next time.

I then cut out a 2 inch piece of vellum and heat embossed Merry Christmas in gold. I wrapped the vellum around the panel so I could glue it to the back so no adhesive would show through the vellum.


Then all I had to do was glue it to a card base! Easy peasy. I think these would be a great card for mass producing to send out at Christmas. I got a few more goodies from MFT, and I'm excited to share what I'll be creating with these! 


My Monthly Hero

   Hello crafty friends!   I received my first ever My Monthly Hero Kit from Hero arts this month, and I have been having so much fun with i...